Jamf Pro API Overview
This page will help you get started with the Jamf Pro API.
Jamf Pro API Documentation
The base URL for the Jamf Pro API is located at /api on each Jamf Pro instance. Documentation and “Try it out” features are built into each instance of Jamf Pro, and can be accessed at /api/doc.
Authentication and Authorization
NoticeAPI authentication does not support the use of SSO. See SSO documentation for more information on places where SSO is supported with Jamf Pro.
Client Credentials
Beginning in version 10.49.0, support for Client Credentials authentication was introduced for the Jamf Pro and Classic APIs. See Client Credentials for additional details.
Bearer Tokens
The Jamf Pro API supports Bearer Token authentication and uses the standard User Accounts and Groups functionality of Jamf Pro. The Create, Read, Update and Delete privileges for an account or group within Jamf Pro correspond respectively with the POST, GET, PUT and DELETE HTTP methods. For more information on the privileges required to perform a specific API operation, see Privileges and Deprecations.
The Jamf Pro API leverages the same User Accounts and Groups functionality of Jamf Pro as the Classic API, but uses a token-based authentication scheme. In order to perform successful requests to the Jamf Pro API you must present a valid token in the Authorization header of each request. The workflow of requesting an initial token and using that token in API requests is outlined below:
- Using basic authentication, request a Bearer Token by sending a POST to
/v1/auth/token. - You should receive a response that includes a token and an expiration date similar to the following example:
{
    "token": "eyJhbGciOiJIUzUxMiJ9...",
    "expires": "2022-01-24T21:35:20.373Z"
}- You can use the previously generated token to make calls to any other Jamf Pro API endpoint by including it in a header using the format
Authorization: Bearer TOKEN_VALUE
Need a little help getting started with Bearer Tokens? We've got you covered, with an example code snippet:
By default, tokens expire after 20 minutes, but you can use a currently valid token to generate a new token with a fresh 20 minute validity period, using the /v1/auth/keep-alive endpoint. Simply send a POST to the endpoint with the existing token in an Authorization header like you would to any other endpoint (see step 3 above). The keep-alive endpoint will respond with a new token and expiration and will invalidate the previous token.
HTTP Methods
The Jamf Pro API is a RESTful interface that uses standard HTTP methods to issue requests and receive responses.
POST
POST is used to create new objects or issue new actions. All POST operations require that a JSON body be passed with the request. Jamf Pro auto-assigns the object an ID and will respond to successful requests with the ID of the created resource.
GET
GET is used to retrieve information identified by the request-URI. Many endpoints support URL query parameters to allow for searching, sorting, and filtering of responses. Supported parameters are documented within the API Reference page.
PUT
PUT is used to update existing records, identified by the request-URI. PUT will overwrite all fields specified within the request body with the values specified, any omitted fields will be set to a null value. Responses to successful requests will include the ID of the updated resource.
DELETE
DELETE is used to remove the resource identified by the request-URI. If successful the message response should include the ID of the deleted resource.
PATCH
PATCH is used to selectively update fields for a resource, identified by the request-URI. If successful, the response will include the ID of the updated resource.
Schema
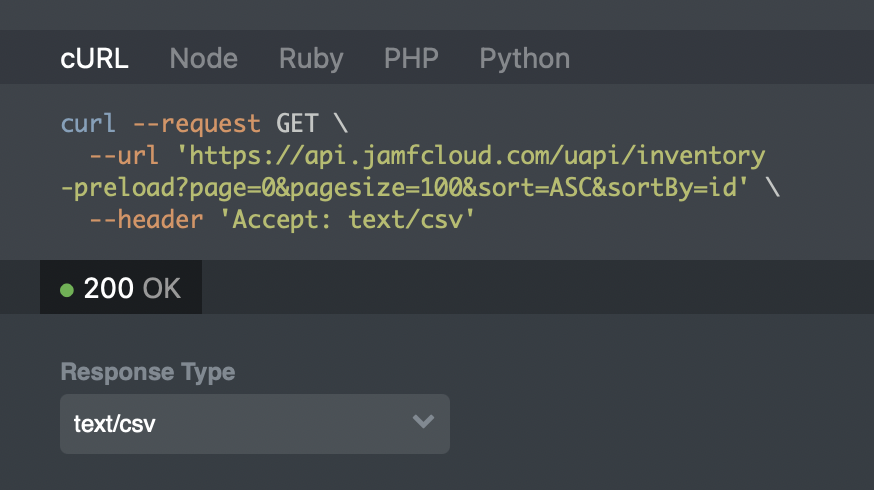
The Jamf Pro API was designed to interact with JSON data types when interacting with most endpoints. In some cases, JSON is not an intuitive data type to support certain workflows, such as file uploads or certificate interactions. Some endpoints include support for interacting with other data types which are denoted in the right column of the API Reference section. The Accept header will indicate acceptable data types to pass to Jamf Pro, while endpoints that support multiple response types will include a dropdown selector as pictured below.

Reference the Accept header and Response Types for allowed data types.
Response Codes
The Jamf Pro API returns standard HTTP status codes for both successful and unsuccessful API calls. All errors returned will contain an HTML response that will contain a message with a description of the failure.
Common response codes and steps to troubleshoot failures.
| Code | Description |
|---|---|
| 200 | Request successful. |
| 201 | Request to create or update resource successful. |
| 202 | The request was accepted for processing, but the processing has not completed. |
| 204 | Request successful. Resource successfully deleted. |
| 400 | Bad request. Verify the syntax of the request, specifically the request body. |
| 401 | Authentication failed. Verify the credentials being used for the request. |
| 403 | Invalid permissions. Verify the account being used has the proper permissions for the resource you are trying to access. |
| 404 | Resource not found. Verify the URL path is correct. |
| 409 | The request could not be completed due to a conflict with the current state of the resource. |
| 412 | Precondition failed. See error description for additional details. |
| 413 | Payload too large. |
| 414 | Request-URI too long. |
| 500 | Internal server error. Retry the request or contact support if the error persists. |
| 503 | Service unavailable. |
Updated 2 days ago